
solvida
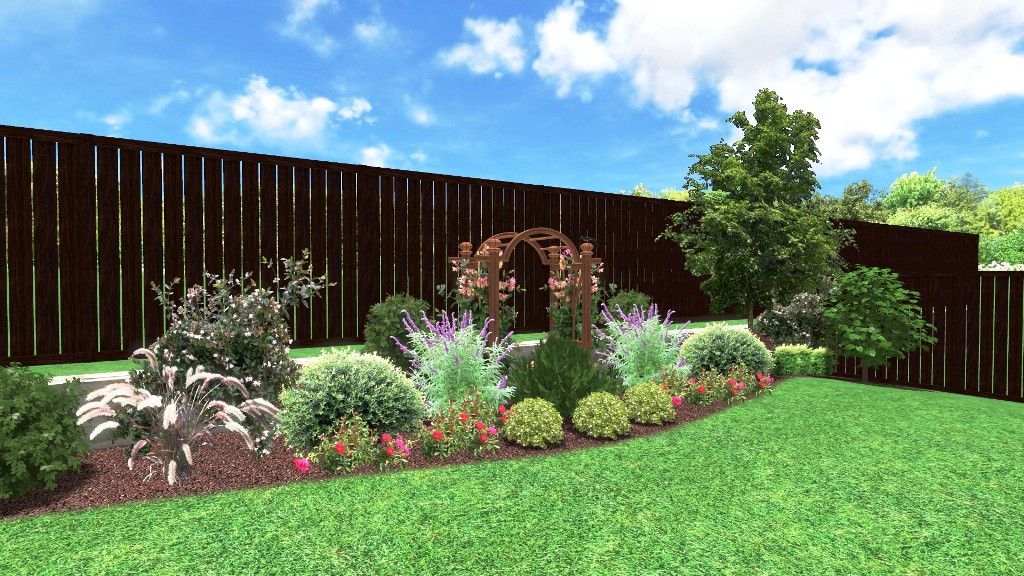
How to Make a Flower Bed
There is no better way to showcase a group of plants or a garden than to give them their very own flower bed. By separating your plants from other landscaped spaces such as your lawn or patio, you will find that maintenance is much simpler. Creating a flower bed that is separated from other yard space can also be defined with metal or stone edging materials to further enhance the look. In addition, you can fertilize, mulch and irrigate specific to the needs of those plants in the flower bed area rather than creating it as you would for your entire lawn. We have outlined some simple steps below to help show how to make a flower bed of your very own.
Determine Flower Bed Size
First you need to decide what size the flower bed will be. To help make a decision, consider things like your budget for the project, what you’re capable of and/or how much labor is needed, what tools are needed, what plants will be in the garden bed and how much on-going maintenance will be needed.
Choose Garden Bed Location
After you’ve decided what size the flower bed will be, you’ll want to choose a location for the new garden bed. Take a survey of your property noting available space for the flower bed, sunlight, access to irrigation and soil quality.
Mark Flower Bed Perimeter
Using a garden hose or wooden stakes and string, lay out the shape of the garden bed you have in mind. These tools will help you to create and visualize the flower bed. Once you have finalized the shape of the bed, you can use turf paint to outline the flower bed perimeter. Make sure to remove the garden hose and/or wooden stakes and string before moving on to the next step.
Remove Grass
Assuming the new garden bed location is currently covered in grass, your next step will be to remove the grass from the new landscape bed area. Depending on how quickly you intend to install new plants, there are several ways to effectively remove grass. The easiest, but most time-consuming method would be to lay a landscaping fabric (or even newspaper) over the area. Secure the material to the soil so it does not fly away. After about 2 weeks, remove the material and all the grass should have naturally died off. Scrape off any remaining grass and dispose of it. Although we don’t recommend using RoundUp for much of anything due to ongoing links to cancer, you can also spray the new garden bed area with RoundUp and it will definitely kill the grass. We advise waiting two weeks before installing new landscaping plants. The fastest method to removing your sod would be to use a gas-powered sod remover or the good old-fashioned way with a shovel and some muscle. Start by using a straight edge shovel or nursery spade to edge the outer perimeter that you marked with turf paint. Push the shovel down about 4″ and create a clean edge to separate the sod around the bed perimeter.
Amend Soil
The most important thing you can do to ensure the long life of your new plants will be to add good soil to the garden bed. Add about 4″ of soil blended with compost and sand to the garden bed area and till in with existing native soil. Tilling can be done with a shovel; however, it’s best to use a gas-powered garden tiller for this task as it is very labor intensive.
Install Plants
Now that your garden bed has been established, it’s now ready for the finishing touches…plants and mulch! Make sure to pay attention to all of the information on your new plant, such as planting distances and growth habits and take into consideration the best time to install ornamental shrubs in North Texas to ensure they thrive. Most all plants will come to you in plastic planters. You will want to dig a hole for your new plant at least the same width and depth (if not a bit larger) than this container. Once the hole has been dug, carefully remove your new plant from its plastic container and gently rough up the root ball a bit, teasing a lot of the roots loose without losing too much of the surrounding soil. Carefully set your plant in the hole and begin packing in the surrounding soil.
Add Mulch
Once your new plants have been installed, cover them with about 2-3 inches of a mulching material such as hardwood mulch, pine bark mulch, cedar mulch or even small rock. This layer of mulch will protect the roots from the elements as well as ensure that any water you give the plants reaches it slowly before it has a chance to run off. Hardwood mulch will degrade over time, so plan to replenish this mulch at least once each year.
Conclusion: And that’s all there is to it. Whether you attempt a project like this yourself or decide to hire a professional landscaping company to make a flower bed for you, your new landscape bed can provide you with beauty for years to come.